
1.RaceDay 2.0 Overview
RaceDay Software was originally developed in Excel driven by a VBA back end. This worked well over the last 10 years but as demands changed this has led to a complete rethink of how registration and timing software should work.
Over the past 18 months we started the programming of the new RaceDay 2.0 a completely stand-alone software package and the new companion website. We were looking for a package that still maintained, at its core, a simple user interface but also allowed for the management of major events.
After an extensive design phase we have started the programming phase with a release date of January 1, 2018.
The designed flow of RaceDay 2.0 includes a completely new approach to registration and results management that will talk to online registration and results systems, onsite timing systems, and results posting websites.
Here are some of the new approaches integrated into RaceDay 2.0
- Full integration with BikeReg.com for event and athlete download data. (Other site will require a csv download of data to upload into RaceDay 2.0)
- Compatible with timing software through either a direct feed or csv import of results.
- Added ability to manage distribution of result to athletes and media through multiple portals. (Live results, email, posting to website)
- Results submission via direct input or uploaded csv file in required formatted templates.
- Allow for user input for continued development of the software.
2.RaceDay 2.0 Tool Strip
The Tool Ribbon provide the main drop-downs to manage your event
![]()
File – License installation and User Login
Event Management – Manage the event details
Athletes – Manage the athletes in your event
Results – Enter and manage results
Reports – Run reports for your event
Live Results – Allows for results to published to a live website as they are entered
Marketing – To follow soon
Options – Manage special details about your event
Messaging – Email/Sms event results
Utilities – Initialize RaceDay and manage back up
2.1.Mouse Use
Mouse Use –Use the data grid to create mouse use as listed below
- Left click-Displays context menu to edit or delete records
- Right click-Performs actions on the line item highlighted
3.File Drop Down
This is the first item in the Tool Ribbon that manages some of the basic information
Add License
Welcome Page
Login In
Exit
3.1.Add License
The free version RaceDay 2.0 downloads as a demo version and will allow for the addition of up to 20 athletes so anyone can run the software.
Upon purchasing your version of RaceDay 2.0 you will receive a License Key for functions that you purchased.
Copy and paste the License key into the box and click the save button. This will active your RaceDay 2.0 software for a period that will close seven days after the date of your event. Please make sure you have no blank spaces at the front or back of the key when you copy and paste.
All reporting is still active but changes will no longer be allowed. If you do need to make change contact RaceDay staff to help you with those needs.

3.2.Welcome Page
This will take you back to the Main welcome screen on RaceDay 2.0 Software
3.3. Login
If you have set up Users from the Utilities Menu this is where they can login in.
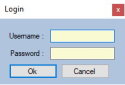
We have now add specific user types to make it easy for you to manage who uses RaceDay 2.0 and what they are allowed to do.
Level 1: System Administration – Full use of RaceDay
Level 2 : Event Manager – Access to Athletes – Results – Reports – Live Results – Messaging Screens
Level 3: Results Manger – Access to Athletes – Results – Reports – Messaging Screens
Level 4: Registration – Access to Athletes – Reports Screens
3.4.Onsite Registration
This will take you to the new Onsite Registration page. Please see the Onsite Registration user guide for complete details on how this new system works.
3.5.Exit
This will allow you to Exit RaceDay 2.0 and will auto save all event details. You will receive a dialogue box to make sure you want to Exit.
4.Event Management Drop Down
The first time setup of the event happens when you initialized your event.
Manage Events – This is the current event you are running
Manage Stages – These are the stages you are running
Manage Categories – Categories within your event
Load Participants – This will allow you to reload the athlete csv file without re-building the event, however this will delete all current riders and results.
4.1.Manage Events
Common Page Terms
Event – think of this as the umbrella that coves the whole event.
Manage Events – Once you have initialized the RaceDay 2.0 software you still can change the details of the event using the manage events screen. Here you can change the event details as need. First, left hand double click on the event you are going to make changes to, this will load the details above and allow for changes. Once done changes are made hit the Update button and the changes are saved to the database.
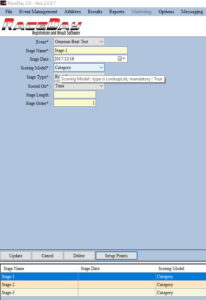
4.2.Manage Stages
Common Page Terms
Stages – this is the actual event for a one day or the first stage of a multi-day event
- Single day events are considered a stage race with only one stage if they will have a time, If you are just scoring based on place, with no time, you can use the Omnium option. (RR, Crit, TT)
- Multi day stage races you can add as many stages as required by using the New button and then hit the save button.
- Multi day omnium races stages are set up based on the athlete file that is import on initialization of the event.
Stage Name – if you are adding more stages this is the name given each stage
Scoring Model – you can score in a category model or a global model
- Category – Scores one category at a time (used most of the time)
- Global – score all athletes at the same time (for this to score correctly there must be unique bib numbers)
Stage Type – There are three stage types
- Road Race – this covers both out and back and circuit races.
- Criterium – a short course event.
- Time Trial – this is a event where athlete race against the clock
Scoring Model – you can score in a category model or a global modal
- Category – Scores one category at a time (used most of the time)
- Global – score all athletes at the same time. Note: Reports will print out based on the categories that the athletes are registered in
Scored On – there are two types of scoring
- Position – Athletes are scored based on the place they crossed the finish line.
- Time – Athletes are scored on the time they crossed the finish line.
Standard Time: Standard time format to import into RaceDay 00:00:00.000 (You must have the period for the separator from seconds to tenths of seconds)
The ability to now import other time formats has been added. This is detailed in the Import Results section.
Stage Length – This is the distance that is raced. If entered, this will allow for information such as average speed of the winner to be displayed on the results reports.
Stage Order – If your event is a multi stage event this is the order they are run in
Manage Stages – Once you have initialized the RaceDay 2.0 software, you still can change the details and how the stage will work prior to starting the event.
You can determine how you will enter and view results By choosing the Scoring Model. This can be changed post event to view category results but placings will remain as overall results.
Stage type will be determined based on the type of stage you are running; single events will follow the same protocol.
Scored on time or place will allow you to choose what type of scoring method you and your officials will use.
All of the stages that your event requires will be built when you initialize the database. The only exception is with a stage race (based on time for the GC). You need to build these stages using the clone stage feature located in the Utilities screen, or you can opt to build each event using the stage manager.
Each stage is created can be changed prior to running the event and some even during the event. Each stage will require a scoring model and stage type. You can change this again by double clicking on the stage below loading the stage information above make the required changes and then use the update button to save your changes. Depending on the stage type some new button are made available
If your event is a Time Trial you set up your start time by clicking on the following the prompts (more details in the help section)
If your event is a Omnium you can set up your point schedule (more details in the help section)
If your event is a Stage Race, bonus time are set up in another screen (more details in the help section)
After changes are made be sure and hit the update button to save the changes.
4.3. Manage Categories
Common Page Terms
- Categories – these are the categories that are created in RaceDay 2.0 when you imported the athlete data base.
Manage Categories – you can manage categories using the same tools as listed above. You can change the name of the category and also set the start time for the category if you are scoring based on time.. You can add additional categories here as well.
Note: If you are using a timing company most will give you the actual duration of the race if not that is when you need to set the category time. (Math: Final Time minus Category Time = Duration
You will need to change your Category start time based on when that category actually started. This will be applied to all of the day of race athletes that are registered after you have set the time. This can be changed after results have been entered and new duration will be calculated.
If you are using a timing system you will need to determine if that system is using actual duration in the output file or just the category timing using the start time to calculate the duration.
You can quickly make changes using your Mouse button by finding the row you want to make a change to and right clicking, use the left button to either delete the row or move the details to the input form above, make your changes, then click on the Update button. All changes are then saved to the database.
This screen also shows category data

Category Name – You can update or change the Category Name
Add Category – You can add a category by using the New Button
Category Start Time – This is the start time for the Category Start Time if you are using a system that is recording the finish time rather than the duration. Example: First group starts at 8:00 AM and the athletes are scored based on that start time athlete in first place crosses the finish line at 9:32 am thus his duration is 1:32
Category Offset – this is the difference between the first category start and each category start after that. Example: Category one starts at 8:00 AM the next category starts at 8:05 AM, the category offset is 5 min. This usually is used on big events with one start for multiple categories starts Road races running events
Category Distance – If you enter the category distance raced the results report for that category will show the winners avg speed. This can be in any distance measurement, miles or kilometers.
Max Participants – If your event has a maximum amount of athlete allow by category you can use this. During the registration process you will be warned when you go over the limit. You will be allowed to over ride the warning.
Laps Check Box – This will allow you to score the category based on laps See lap scoring Tech Guide
Participants – This will show you the athlete count in each category in the grid below
4.4.Load Participants
This will allow you to upload the Athlete File in a csv file format that you downloaded from your registration service. This is the same as you did in the initialization process but by-passes the Event setup. You may need to do this if there was an updated athlete file.
NOTE: If you are running a omnium, please contact RaceDay Software through the support system so we can help with the csv file upload as it requires a small amount of work to support multi day upload.
5.Athlete Drop Down
Athletes will be populated during the initializing of RaceDay 2.0

Event Participants – Athlete management screen
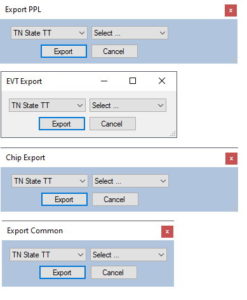
Export to PPL – export for Lynx camera
Export to EVT – Export for Lynx Camera used for stage races only
Export to Chip – export for chip timing common fields
Export to Common – export everything for manual set up of fields
5.1.Event Participants Screen
Common Page Terms
- Event Participant – these are the athletes who have entered your event
- Online Athletes – these are the athletes who registered online
- Day Of Race Athletes – These are the athletes who registered onsite prior to the event and are entered manually.
- Multi-Day Entry – If you are running a multi-day event you can register the athlete for multiple categories
Managing Athletes – This is made easy with RaceDay 2.0, Your online registered athletes are already loaded when you initialized RaceDay 2.0. Edit the athlete information by using your mouse and double clicking on the athlete, moving them into the form, make the changes and then clicking on the update button.
By clicking on the New button you can now add new onsite athletes. RaceDay 2.0 has a large athlete database running in the background so the first search would be by license number then by last name and so on as you narrow down the option listed below. Once you have found the athlete make sure you assign a bib number and that the details are correct, the stage is set that you want the athlete in, and click the save button. If the athletes are not found you can manually enter the athlete’s details and save.


![]() New: Added County and Country Code
New: Added County and Country Code
![]() New: Add Payment Types and Payment Amount (This will be displayed in the Event Summary, more details in Utilities under Payment Types.
New: Add Payment Types and Payment Amount (This will be displayed in the Event Summary, more details in Utilities under Payment Types.
If you are running an Omnium you can also choose to register the athletes for multiple days.
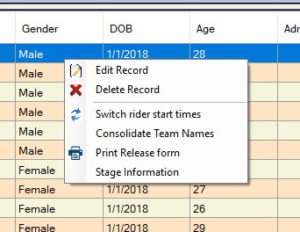
You can also right click on the athlete in the screen, This will allow for athlete details to be edited

Edit Record – this will add the athlete details into the form to allow for editing. Remember to hit the update button below to save the edits.
Delete Record – this will delete the selected athlete from the event. Be careful as this will remove all associated results.
Switch rider start time – in a time trial you may need to switch two athlete’s start times due to a issue. Highlight the two you want to switch then hit the change button.
Consolidate Team Names – if you want to make sure all team names are the same you can use this function to do so. Highlight all riders you wish to have the same team name. You will be given a box to type in the team name then hit Set Team Name and this will change all highlighted athletes.

![]() Print Release Form – Printing a standard USA Cycling release form is easy. Choose the athlete by right clicking on the row and then hit print release form. A form will appear just hit the print icon and the filled in form will print. Note: even though the form has no data in it it will print filled in
Print Release Form – Printing a standard USA Cycling release form is easy. Choose the athlete by right clicking on the row and then hit print release form. A form will appear just hit the print icon and the filled in form will print. Note: even though the form has no data in it it will print filled in
![]() Stage Information – If you want to see who has the same last name or you are looking for duplicated bib numbers the feature will give you those details.
Stage Information – If you want to see who has the same last name or you are looking for duplicated bib numbers the feature will give you those details.
5.2.Export to PPL
This will export a PPL file in a CSV format. This is a direct import for LYNX Camera Systems.
5.3.Export to EVT
This will export a CSV file into the EVT file format used in a Lynx camera system
5.4.Export to Chip
This is a standard csv file with the most used Athlete Information that is require by the chip timing company. You may want to download and send a copy to your timer to make sure that all relevant information is include. If the timing company requires more you can use the Export to common which will list everything and can then be opened in excel and edited to meet your requirements.
5.5.Export to Common CSV
This will export all athlete information into a csv file that you can open in Excel to edit for your specific requirements.
6.Results
This provides the area to mange event results.
6.1.Results (Manual Entry)
Common Page Terms
- BIB # – This is a unique bib number for the athlete in this ca
- KOM/QOM – If your event provides for this special award you can enter the results here
- Sprints – If your event provides for this special award you can enter the results here
- Best Young Rider – If your event provides for this special award you can enter the results here
- Penalties – If an athlete is given a time penalty if can be entered here
- Reason for Penalty – reason for penalty may be entered here.
- Hold Time – You can use this if you are entering multi athletes with the same time
- Finial Time – This is the clock time that the rider crosses the finish line.
- Place – This is the place that the athlete crossed the finish line.
- No Time reason – if an athlete does not receive a time or place you can choose a reason from the drop down.
- Intermediate Bonus – If you are awarding time bonus this is where you enter them
NOTE: you can manage the entry boxes that appear here. If you do not need them you can hide them using Meta Data Management.
Entering Results – This is made easy using RaceDay 2.0.

The screen is split into three sections.
Entry Section – Upper Left
Un-Scored Athletes – Upper Right
Scored Athletes – Bottom of screen
How it works – This simple system will help you keep track of athletes in the category you are scoring in.
- Select the category you are going to enter results in. Note if this is a multi stage event you will also need to choose the stage you want to enter result into, this is located above the scored athletes below.
- Choosing the athlete you want to score can be done in two ways; 1)You can type the athlete bib number in the bib box and hit enter this will then load the athlete into the scoring mode and in the Un-Scored section now only the athlete you are scoring will show up. 2)double click on the Un-Scored athlete to load it into the scoring mode.
- Entering time is easy. Just click into the Finial Time Box.Once the cursor is there just type in the time you want to enter. No need to worry about colons, so a time entered of 2 hrs 15 min 20 sec would be 21520 then hit the enter key and the result is recorded. If you need to enter tenth of seconds, all you do is follow the same entry procedure but after you get hrs, min, sec, then use the period key then enter tenth so 21520.125 would be 2 hrs 15 min 20 sec and 125 one thousands.
- If you had set a Category Start Time, the time you entered would show up below as the Finial Time, the Category start time shows up as the Start Time, the Duration is the actual race time based on Finial Time minus the Category Start Time.
- If you set up a Category offset this will be taken into account.
- The athlete is now moved from the Un-Scored section to the Scored section, You can change or update the athletes time by double clicking on the athlete and change the required information, then clicking on the Update Button.
- If you get through the scoring and there are still athletes left in the un-scored section, you will want to figure out what happened to them and then, using the No time reason option in the entry screen to the mass entry option
- Mass entry option is found by highlighting the athlete(s) (NOTE:use the shift key to highlight multiple athlete this only works for DNS- DNF- DNP- DQ)DQ

Note: Time can be a bit tricky, talk to your offical or time keeper to make sure that you are all on the same page. Please feel free to contact support if you have questions, we would be glad to help you walk thru the thought process.
6.2.Results Management (Timing System)
If you are using a professional timing company RaceDay 2.0 make it easy to import result directly from their timing system. Complete details are covered in the section below.
Currently there are two type of CSV file that will import
- LIF File Type – This is the file type coming from a LYNX Camera
- Bib, Time – This is a file type coming from any other timing system. (Note: you will need a header row with bib and time shown.)
Standard Time Format: Standard format to import time into RaceDay 00:00:00.000 (You must included the period for the separator from seconds to tenths of seconds)
![]() If you are using the Standard Time Format when you import there will not receive the following time format option. If you receive the option choose the time format and continue with the import.
If you are using the Standard Time Format when you import there will not receive the following time format option. If you receive the option choose the time format and continue with the import.

Warning: If your time crosses a timing format you must adjust the time. Example a criterium is a 1 hour criterium an the first rider finished in 59:32 and the rest of the field finishes in 1:01:02, then you will need to adjust the winners time to be 00:59:32 in the import file.
6.3.Results List
Results List – This is a page where you can view all of the results that have been entered, you also have the ability to manage most result entries here as well.
Stage Results – If you have a single day event or a multi-day event you can choose which stage to view the results that you have imputed.
Category Results – You can opt to view all results or view results by category using the drop down menu.

Any Athlete that does not have a result or is set to DNS, DNF, DQ, or DNP will show up in Red, this is a quick way to see if results need to be added for and athlete prior to printing results to post or sending out thru emailing, SMS, or posting to live results..
Managing Time Cut – If you are managing results for a stage race that has a time cut this is the screen that allows you to set and review the time cut athletes prior to finalizing the cut.

- Time Cut – this is set at 20% in RaceDay 2.0. This can be changed in the options drop down.
- Clear – This will allow you to change the time cut time this works the same as results entry of time
- Test – This will test the time you have entered and will mark all athlete that will be time cut based on the entered time. A warning message will appear asking if this is what you want to do. Click on yes if want to set these Over The Time Limit (OTL) Athletes, if you click no you can then click on Clear and it will clear out the time and allow you to reset the time

- Set – If you want to accept the time cut athletes you can then hit Set and this will set those athletes to OTL
- Reset – will clear the OTL athletes and put them back prior to the the OTL set.
You can set individual athletes to OTL by highlighting them and choosing the OTL option.
Publish Live Results – This will push the results up to RaceDay Events Software website or to the event website if you have purchased that option. This only publishes that categoryyou are viewing, this is faster than pushing up the whole event each time using the Live Results drop down.
6.4.Results List GC
If you are managing a stage race, this will allow you to see the complete event . This will be displayed in time if it is a stage race or points if it is an omnium.
6.5.Results List BYR GC (Best Young Rider)
This will show you the riders who are competing in this category based on the age that you have set in the option menu. By default this is set to Under 23 in RaceDay 2.0
6.6.Team GC Candidates
Details coming soon
6.7.Results List Team GC
If your event has the Best Team competition this will calculate the Best Team based on the following
- Top three riders in each stage
Note: Each team member must have the same team name. If these are not the same you can use the Consolidate Team Name Option found in the Athletes section under Event Participation.
6.8.Import LIF Results
This is a file from a Lynx camera system that will be imported to create the results for the selected category. This will come from the timing crew.
Select – This will allow you to select the stage and category that you want to import results for. You will not need to select a category as it is include in the LIF file.


Select LIF File – The LIF file import will provide you with a few options to make sure that the file has the correct information to import into RaceDay2.0. Once you have clicked on the Select LIF File button you will then be able to locate the LIF file on your computer. Once you have located the file, open the file and the athletes will appear in the Dialogue box. If all of the information matches, the riders will be in black with all of the details filled in. If the rider is in red then one of the columns information is missing. RaceDay 2.0 is looking for three items that match the Athlete data base, LIF Cat, LIF Lic#, LIF Bib. You can adjust what it is looking for by using the matching items option located at the top of the screen. By clicking an option off the athletes may turn black and then they will be imported and placed correctly. Any athlete that has the information but is not found will be imported as a Unknown Athlete and added to the results. You can go back to the Event Participants Screen and update the Athlete information and it will carry through to the results.
Import LIF Results – This will then allow you to import the results into the RaceDay 2.0 results tables
6.9.Import Bib,Time
This is a CSV file that will come to you from your timing company. This import tool that will allow you to a work with any system that we are aware of. Just make sure that the report time follows the required time format.
Note: Time must be in this format to import into RaceDay 00:00:00.000 (You must include the period for the separator from seconds to tenths of seconds)
Note: The CSV file must have a header row with Bib, Time

Stage – Choose the stage you wish to enter results for from the drop down option.
Category – Choose the category you wish to enter results for from the drop down option.
Select CSV file – The CSV file import will provide you with a few options to make sure that the file has the correct information to import into RaceDay2.0. Once you have clicked on the Select CSV File button you will then be able to locate the CSV file on your computer. Once you have located the file, open the file and the athletes will appear in the Dialogue box. If all of the information matches, the riders will be in black with all of the details filled in. If a rider is in red this means one of the columns information is missing. RaceDay 2.0 is looking for three items that match the Athlete Data Base, LIF Cat, LIF Lic#, LIF Bib. You can adjust what it is looking for by using the matching items option located at the top of the screen. By clicking an option off the athletes may turn black and then they will be imported and placed correctly. Any athlete that has the information but is not found will be imported as a Unknown Athlete and added to the results, you can go back to the Event Participants Screen and update the Athlete information and it will carry through to the results.
Import Results – this will allow you to import the results into the RaceDay 2.0 results tables
6.10.Bonus / Special Classments Set Up
This section will allow the set up of Bonus / Special Classments for and event if they apply. A detailed guide for this section can be found here.
7.Live Results
RaceDay 2.0 will allow you to publish live results to our website or your website if you have purchased this option.
7.1.Set Real Time Results
This option will push results to the websites as they are entered, currently this will slow down RaceDay 2.0, we are looking into this and will have a solution to speed up the process shortly.
7.2.Publish Live Results
This option will publish all currently entered results, depending on internet connection this may take a min or two. you have the ability to manage how to upload results also see a preview of the results using the management option.

You can publish all results or choose to publish stage and category, by using the view Live Results Local this will produce a preview of the results that are being pushed up to the websites.
8.Reports Drop Down
RaceDay 2.0 provide a comprehensive list of reports, If you do not see a report that will provide you with the need information please contact RaceDay 2.0 support and we will build a special report for your. event.
8.1.Standard Reports
RaceDay 2.0 has a list of reports that covers most standard reporting that is required at events. These are pre-formatted and can be run at any time during your event. RaceDay 2.0 uses a report engine that builds the reports on the fly each time you run the report. This system provides the ability to save the report in different formats. The button are standard from Windows report writer.

Using the report writer
- Choose the Event from the first drop down
- Choose the Category you wish to print from the second drop down
- Choose the Report you wish to run
- Click the Run button – this may take a second or two to run the report and open it on your screen
- Using the Print icon in the ribbon you can print hard copies of the report. If you want a PDF, use the PDF writer you have installed on your computer
Options from above
- Page and print layout should be set for you.
- Save button – You can save the report as an Excel, Word document, or a PDF document.
![]() Complete reports/details list coming soon
Complete reports/details list coming soon
8.2.USAC Export
RaceDay 2.0 is set up to create the standard 16 column CSV file required to upload to USA Cycling’d National Ranking System. There are some change that must be made to match the required category,gender,class, and age. If you are need help please follow the link below to USA Cycling’s Results and Rankings Guide.
8.3.Custom Reports Directory
Currently this is available only if the report is requested through RaceDay 2.0 support staff. Please allow 48 hours for the report to be built and sent to you. This will be updated in the future so you will be able to build reports through a custom report writer.
This will allow you to build your own custom report(s) and save them, and point RaceDay 2.0 to the location where you saved the custom reports. We suggest you create a folder on your desktop to save the reports in. You will need to insert the location into the directory shown below then click save. RaceDay 2.0 now know where to locate the special reports and they will appear in the reports drop down.

9.Marketing Drop Down
Details on this section to follow
10.Options
10.1.One Day License Fee
If riders pay an onsite one day license fee, you are able to use this to add the price which will then be used to calculate the total collected in the Event Summary report

10.2.Event Insurance Fee
If your event needs to pay an outside insurance company a fee based on unique athlete count, you can use this to enter the cost that will be used to calculate the total cost to the event and will show in the Event Summary Report.

10.3.Event Optional Fee
This will allow you to add a event specific fee should you need to. You will first be asked to create a name for the fee and then add to fee amount. Example: A association fee

10.4.Best Young Rider Age
If your event is scoring the Best Young Rider you can set the age here. RaceDay defaults to Under 23. This would be athlete who are 22 years old.

10.5.Time Cut
RaceDay 2.0 will allow for you to set a time cut for multi-day events. The default is set to 20%

You can set this at any percentage you choose. Note this is managed in the Results List screen under Results Drop Down
10.6.Results Tie Breakers
If you are running a multi-day event, this will allow you to set how ties will be broken both in Stage or Omnium scoring for the overall placings. Tie breakers for the Classments are set in the Classements section.

There are currently four options that can be set up based on how you want ties to be broken
- Winner of the stage that you set in the Results GC Screen (Upper right corner of the screen)
- Sum of the rider placement in each stage with the lowest total taking the better over all placement.
- Place in the last stage
- Tenths of seconds from a selected stage
- Number of Stage wins (Just added)
You can set the order of tie breakers by listing them in the order you choose separated by a comma.
10.7.Same Time LIF/CSV Import
In some scoring systems and some event types athletes are scored on time recording out to hundredths or thousands by default, you want athletes time to be scored on a standard but want them scored with the same time if they cross the finish line with a certain amount of time. This will change everyone’s who is within the same time setup time. you will see the change prior to the finial import of time. This is used mainly in cycling events.

10.8.GC Inc Tenths in Calcs
If you wish to use tenths of seconds to calculate General Classification you can turn this feature on here.

10.9.Multi User Options
Please use the Multi User guide to set up Multi User system
11.Messaging System
It is important to be able to provide your athletes with results as soon as possible. RaceDay 2.0 has an email system built in that you can email all the reports as PDF, this does require that you have internet access.
11.1.Email Error Log File
The email Error Log File allows you to notify us if there was an error during the use of the software. This will send us a detailed message of the error. Just click on the Email Error Log File and it is on the way to a RaceDay2.0 support staff member.
11.2.Email Template

- Race Templates – These are the Email Templates that you have created for your events. You can have as many as you want to create
- Add Template – Need to add a new Template? Just click on Add Template and give it a name then add verbiage into the box and save
- .

- Delete Template – To remove a template that you no longer need use the Delete Template
- Save Template – Once you have the new Template Name and verbiage just use the Save Template button to add it to your list
- OK – This will close the Template Entry Screen
11.3.Send Email
This is the setup screen used to send emails.

- Race Template – This is the template you would like to use that was set up in the templates screen
- Stage – This is the stage you wish to send
- Category – the category you would like to send results to is choosen here
- Return email address – If you would like a specific email to collect response it can be added here
- Subject Line – This is pre-filled in for you with a standard, we suggest that you use it but you may add a custom subject line.
- Attachment – Results from the reports system can print out your results as a PDF, we suggest that you use this system and attach the results as a PDF

- Add Recipients – If you would like to add other recipients to the email you can add them here or use the Options in the header line to add them in so they receive every email that is sent, this works great for media.
- Test Email – If you would like to preview the email you can enter a email address and hit the Send test email button and only the email(s) in the Test Email Adr line will receive the email.
- Send Emails – This will send the emails to the recipients who have a valid email address within RaceDay 2.0 You can follow the progress by looking in the lower right of the screen and a sent status will show there. (In the very bottom left of the RaceDay 2.0 Screen
11.4.SMS Messaging
Coming Soon
12.Utilities Drop Down
Utilities are tools that drive the set up and control of RaceDay 2.0
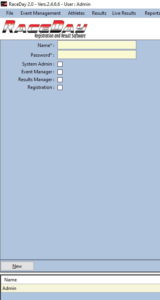
12.1.User Options
RaceDay 2.0 will allow the event director to set up a series of users and the functionality that they can perform when running the software. You can set user name(s) and create the passwords for that individual user or group of users.
![]() We have now add specific user types to make it easy for you to manage who uses RaceDay 2.0 and what they are allowed to do.
We have now add specific user types to make it easy for you to manage who uses RaceDay 2.0 and what they are allowed to do.
Level 1: System Admin – Full use of RaceDay and can built the user table and apply passwords
Level 2 : Event Manager – Access to Athletes – Results – Reports – Live Results – Messaging Screens
Level 3: Results Manager – Access to Athletes – Results – Reports – Messaging Screens
Level 4: Registration – Access to Athletes – Reports Screens
Danger: is as a System Admin you set in a password and then lose it, currently you will need to call RaceDay support to reset the system. Please write down you password and protect it.
12.2.Forms Management
![]() Forms management is a new tool that will allow you do manage the input labels on each screen. You can change the label name to what ever makes sense to you, this was added for RaceDay to be use in any language. You can use this to mange what is shown on each screen, you can hide each label and the input associated with it.
Forms management is a new tool that will allow you do manage the input labels on each screen. You can change the label name to what ever makes sense to you, this was added for RaceDay to be use in any language. You can use this to mange what is shown on each screen, you can hide each label and the input associated with it.

- The drop down at the top right corner will allow you to choose the section that you wish to update or hide the labels. Changing the display index to 0 will hide that input box on the chosen screen. You can rearrange the order of the input labels by changing the index value. Be careful when you reorder a complete page.
- Use the save button to save and make the changes
- Rest will put the form back to its standard format
12.3.Payment Types
![]() RaceDay now has the option to track all event payments, both online payments that are included from your online provider to onsite payments. This can be as detailed as the event requirements.
RaceDay now has the option to track all event payments, both online payments that are included from your online provider to onsite payments. This can be as detailed as the event requirements.

RaceDay comes with just two options
- Online: this amount is that was paid for and down loaded from your online provider. This is done during your athlete import.
Note: You can rename Online but do not delete it
- Onsite: This is the amount that is paid by athletes when they register onsite. If you choose you can break this down even further by adding options. Examples would by Cash, Credit Card, or Check.
- These options after they have been added will appear in the Manage Athletes screen during the onsite registration process.
- Detailed finical information will appear in the Event Summary report that can be run at any time. (details on this report are in the reports section)
12.4.Initialization Wizard
This option will do the same thing as the Initialized Database option shown below.
12.5.Clone Stage
This feature is used when you are doing a Multi Day Event, Such as a stage Race where you want are data for each stage you have set up clone to each stage. This will create a database for each stage that you clone from. Example: Stage 1 has 275 athletes and you want to clone them to Stage 2 just use the Clone feature, you can clone from every stage to a new Stage.
12.6.Export Everything
This is a special export for an event that is using a timing system by Lynx Cameras and will need to be supplied to the timing crew. This file will be saved on your desktop
12.7.Colors
You can change the colors of the software to make it match personalized color scheme
12.8.Database Options
This drop down is used to initialize RaceDay 2.0 and also to manage and save/back up RaceDay 2.0
12.8.1.Initialize Database
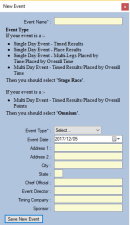
This is the tool that will walk you through the system and will build your event for you, it is the first step to event setup.

- Event Name – this is the name of your event. Please note: you can add a presented by or sponsor here it will be displayed on all reports.
- Event Type – This may seem a little different in the approach, we have spelled out the details of the two event types
If your event is a
Single Day Event – Timed Results
Single Day Event – Place Results
Single Day Event – Multi-Legs Placed by Time/Placed by Overall Time
Multi Day Event – Timed Results/Placed by Overall Time
Then you should select ‘Stage Race’.
If your event is a :
Multi Day Event – Timed Results/Placed by Overall Points
Then you should select ‘Omnium’
If you have a question about Event type please call contact RaceDay Staff and we will gladly walk you through the though process.
- Event Date – This is the Date of your event. If you are running a multi stage event you will need to adjust the dates on each stage in the Event Management drop down and the stages link.
- Address 1/Address 2 – This is the event location address
- City – This is the city of the event
- State – This is the state of the event
- Chief Official – this is the Official in charge of your event from the sanctioning body you are using
- Event Director – This is the person in charge of the event
- Timing Company – This is the timing company you are using to time your event
- Sponsor – this is the sponsor/s that are supporting your event.
Save New Event button will save the event details and move you to the next step of loading your preregistered athlete.
This process will allow you to map your pre registered riders to the RaceDay 2.0 database structure. Using the drop down on each line you can match your import from the athlete database.

- Load CSV File – This will allow you to find where you saved your preregistered riders database that downloaded from your online registration site. You can then match each row.
Note: If you have used BikeReg as your online service, you will be prompted to determine whether you would like RaceDay 2.0 to set up your categories automatically. We suggest that you do. All others, you will need to follow a few more simple steps to set up you stage/s.
- Create stage – This will bring up a Create Stage form that will allow you to create stage details. Complete details are found in Section 4.2
- Import Data – Once you have created your stage, you can import your athletes by clicking the Import Data Button.
You event is now setup and you are ready to manage the event.
12.8.2.Reload Master Athletes
This feature is currently locked out. More information to follow
12.8.3.Backup Database
RaceDay 2.0 does not require a save step as the PostgreSQL maintains the database in a constant save state. If you should have a computer failure you are not protect and may not be able to recover the current database. We have a built in Backup feature that we recommend you use through out your event to insure there is a backup point should you have a computer issue. When you choose the backup feature RaceDay 2.0 will follow normal practices and ask where you would like to store the file. We would recommend that you store it on a flash drive. Choose time through out the day that good point to back up from.
RaceDay Staff have found that if you maintain a folder with just the days information, PPL/Chip files and LIF/CHIP Result files, it makes it fairly fast and easy to recover from a computer meltdown.
12.8.4.Restore DatabaseRestore
Should you need to restore a RaceDay2.0 database, this will feature allow you to do just that. Click on the Restore link and find the RAK file that you want to restore, The database will be restored from the point that it was last saved.
If you are onsite an have a issue and request RaceDay Staff support this may be required for you to send us the file so that we can load in our system to find and resolve the issue.
12.8.5.Migrate Db Bus Logic
There are time when you receive a new update the there will be a need to update some of the BUS Logic running RaceDay 2.0. You will be notified if you need to use this option.
12.8.6.Manage Meta Data
Manage Metadata will be available in the near future.
12.8.7.Master Athlete File
Access to this section currently is not available to users and is a RaceDay 2.0 Admin area.
13.Help Drop Down (Far right of tool strip)
This section will provide user help for RaceDay2.0
13.1.On Screen Help
Coming Soon
This will allow you to turn off the on screen help that appears on each screen as you move through RaceDay 2.0. We will be adding the onscreen help in the near future.
13.2.Online Real-Time Support
Coming Soon
This will provide the same user guide that is online for the user to access if they are not connected to the internet or have a printed copy.
13.3.About RaceDay 2.0
RaceDay Software was originally developed in Excel driven by a VBA back end. This worked well over the last 10 years but as the demands and technology have changed, we had to rethink of how registration and timing software should work.
Over the past 18 months we started the programming of the new RaceDay 2.0. A completely standalone software package and new companion website. We were looking for a package that still maintained, at its core a simple user interface but also allowed for the management of major events.
After an extensive design phase we have now started the programming phase.
As we design the flow of RaceDay 2.0 we will be able to include a completely new approach to registration and results management that will talk to online registration and results systems, onsite timing systems, and results posting websites.
Here are some of the new approaches we will be integrating into RaceDay 2.0
- Full integrated with BikeReg.com for event and athlete download data. (Other sites will require a csv download of data to upload into RaceDay 2.0)
- Compatible with timing software through either a direct feed or csv import of results.
- Ability to manage distribution of result to athletes and media through multiple portals. (Live results, Email, posting to website)
- Results submission via direct input or uploaded CSV file in required pre-formatted template.
- Allow user input for continued development of the software.